Tuesday, July 9, 2013

Fruit Pizza

When time is of the essences or I am just being plain lazy, Betty Crocker is my BFF! We love her GF brownie, chocolate chip cookie, and cake mixes. The brownies are awesome! 


Betty has added a sugar cookie mix and a flour mix to her options. I am excited! Before our kids were GFCF they loved the Pampered Chef Fruit Pizza. I loved to make and take it to potlucks and it was one of the most popular Pampered Chef party foods I use to serve when I was a Consultant. But once they could no longer eat it I no  longer made it. 

I just recently discovered a dairy free creme cheese alternative.
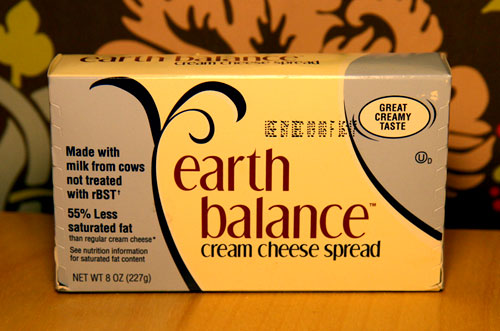
Waiting for this to hit our local store.
 

So now with the new Betty Crocker Sugar Cookie Mix I am looking forward to making this yumminess again soon! 
The following recipe is from the Pampered Chef site: 
http://www.pamperedchef.com/recipe_search/recipe.jsp?id=9660

Ingredients:


1  package (18 ounces) refrigerated sugar cookie 

dough
1  package (8 ounces) cream cheese, softened
1/3  cup sugar
4  cups assorted fresh fruits such as sliced strawberries, kiwi, bananas, peaches, blueberries, raspberries or mandarin oranges

Note: I would drizzle chocolate over the top like the picture. Yum


Directions:
  1. Preheat oven to 350°F. For crust, shape cookie dough into a ball. Place dough in center baking dish; flatten slightly with palm of hand and roll out dough to 12-inch circle, about 1/4-inch thick. Bake 18-20 minutes or until light golden brown; cool 10 minutes. Cool completely. For topping, combine cream cheese and sugar mixing well. Spread mixture evenly over top of cookie. Arrange fruit over cream cheese mixture. Refrigerate. Cut into 16 wedges.
Yield: 16 servings
Nutrients per serving: Calories 210, Fat 10 g, Sodium 170 mg, Dietary Fiber less than 1 g
Cook's Tips: Substitute canned sliced peaches, well drained, for fresh peaches and grapes, cut in half, for blueberries, if desired.
Enjoy!

Sunday, July 7, 2013

Blast from the past...Monk Food aka Lentil Soup

The following post is from March 13, 2008 this is my now 15 yr old! Not many things have changed! She still loves to cook, and still is a picky eater! :0)

Monk food


Yesterday we read Chapter 3, volume II, Story of the World. This chapter addresses the spread of Christianity to Britain. One of the suggested activities was to prepare Lentil soup. I have never had lentil soup but loved the idea of eating as the monks would. We ever pretended it was butter so we could have butter on our bread! Emily could not get over that the monks were not allowed butter on their bread nor that they were not allowed to meat at breakfast. "No sausage or bacon? Poor them!"

Emily loves to help in the kitchen and this was no exception. She loved chopping all the veggies, adding the lentils and watching the spinch wilt. The lentil soup was wonderful and easy to make. Emily on the other hand has a different opinion, can you say YUCK! Did I mention that Emily is an extremely picky eater? At least she tried the lentil soup.
Because we are a larger family I doubled the recipe for lunch tomorrow. Well that was the plan, for evening snack Jeff, Sarah Elizabeth and I had another bowl. At Sarah Elizabeth's suggestion a few bowls were shared with their Godmother and Godfather, they called to say the soup was yummy! So there was no soup left over for lunch! ;0)


Lentil Soup

1 onion (we used a vidalia)
2 carrots, chopped
2 cloves of garlic
1 bay leaf
1 (14.5) can crushed tomatoes
8 C water
2 Tbs. vinegar
1/4 C of olive oil
2 stalks of celery, chopped
1 tsp. dried oregano
1tsp. dried basil
1 C lentils
1/2 C spinich, rinsed and thinly chopped
Salt and ground pepper to taste

*Note: I added 2 Tbs. Johnny's Season (we sprinkle this on about everything!)

In a large soup pot, heat the olive oil over medium heat. Add onions, carrots and celery; cook until stir onions are tender. Stir in garlic, bay leaf, oregano and basil; cook for two minutes.

Stir in lentils, add water and tomatoes. Bring to a boil. reduce heat,a nd simmer for at least one hour. When ready to serve, stir in spinach and cook until it wilts. Stir in vinegar, and season to taste. Enjoy!
This makes about 6 servings.

Friday, July 5, 2013

Rice Crispy Treats

I cannot remember the first time I ever had a a rice crispy treat. But I am sure it was quite wonderful experience! When our children went GFCF, Emily worried about the fun food she would no longer be able to eat. The first yummy I made for them was GF rice crispy treats. I must admit the cereal I used was less than desirable. :0(   But i kept trying using different cereals over the years.

The other day my BFF Janet called to let me know that she had found Kellog's GF Rice Crispy cereal mark down. Did I want any? Um, yes! She scored 3 boxes! I was so excited!

The exchange occurred at a family baby shower. Oh my goodness it was so hot that day, 95 degrees in Seattle is just down right mean. 95% of Seattle folks do not have a/c in their homes.ous included, I DO NOT DO HEAT. Around 11 pm it was finally below 85 degrees. Emily asked if it was cool enough to make rice crispy treats because she could not wait! I made her wait till in the morning. After all it could count as breakfast right?! :0)  Holy cow were they good! Tasted just as I had remember. The kids were soooo excited.

Enjoy~Blair Lynn


GLUTEN FREE DAIRY FREE RICE CRISPY TREATS

6 C GF Rice Krispies
3 TBSP Earth Balance 
1 bag of mini marshmallows or 10 oz. of large marshmallows

In a large sauce pan melt earth balance on low. Add marshmallows, stir until completely melted. Remove from heat.

Add cereal and coat until well covered.

Using a buttered spatula or wax paper evenly press mixture into 13 x 9 x 2 inch pan coated with cooking spray or earth balance. Cool. Cut into squares or shapes.

MICROWAVE DIRECTIONS:
In a microwave-safe bowl heat earth balance and marshmallows on HIGH for 3 minutes, stirring after 2 minutes. Follow steps 2 and 3 above. Microwave times may vary.

Wednesday, June 26, 2013

Frozen Pup Treats!


Last January our family became richly blessed by the newest family member to join the crazy Sprouse House. Harley is a 6 year old Golden/Yellow Lab. He sooo fits in! It has been a long time since I have loved a dog like I love Harley. He is suppose to be our son, Joseph's therapy dog. But we all know he is my boy. :0)

Seattle summers last about as long as a blink of your eye. It does not start until July 5th and runs through the end of Augusts. Sometimes we are lucky and the rains hold off till September. But once summer kicks in it is great. Sometimes we make it out of the 80's! When it is hot all you want to do is eat frozen anything. Harley included. Harley loves to chomp on ice and ice cream! I was really excited when I saw a recipe for frozen dog treats aka Frozen Paw treats but for 1/4 of the price. 

My doggie tasters Lucy, Clifford, and Harley gave it 5 paws and 3 wagging tails!
May your dogs bowl be bountiful
~Blair Lynn

Frozen Paw Treats
1 Large container of yogurt I use plain
1 cup of peanut butter
3 large carrots minced
4 very ripe bananas (the riper the better)

Mix ingredients in food processor till smooth. Place in ice cube trays for 24 hours. Remove and place in ziploc bag. I cut up the ice cube before giving to Harley, otherwise he just swallows it whole! 

You can switch up the ingredients. I have used apples, peas, and even included kale!

Sunday, May 19, 2013

FLOURLESS PEANUT BUTTER COOKIES

Every year when the warm settles in, it never fails that I get the urge to bake. I guess to make up for all the cool times I should have taken advantage of but didn't! Luckily the Pacific Northwest weather wavers back and forth between 50's-60's in the spring. It does not really gets warm until around July 15th but this spring has been different. It is as if Mother Nature has totally lost her mind! We have had the most beautiful spring. Full of warmer than usual sunny days and now summer weather. Later this week it is going to be almost 80 degrees! Unheard of in these parts.

Our 12 year old son Joseph, took a nasty fall off a playground structure the other day resulting in him being stuck in bed for the few week. I have been wanting to try these flourless peanut butter cookies for weeks. So when it was my turn to take a break from sitting with Joseph I headed to the kitchen to decided what was for dinner and snack. So here I am making my kitchen HOT baking cookies! :o)

I learned several things making these cookies:
1. Use a good brand of peanut butter.I used an off brand i picked up at Grocery Outlet. Too oily and not enough peanut butter flavor.

2. Start out small and work your way up. I could not find my Pampered Chef small scoop that i like to use when making cookies. I thought I had the medium scoop but guess what....it was the large! oops These cookies reallllly spread! They actually doubled in size.

3. I rolled the cookies in raw brown sugar... it altered the flavor greatly. Giving the cookies more of a brown sugar flavor. My cookie tasting expert told me that they were ok, but she prefers my stand by peanut butter cookies.

4. Do not add time to the suggested cooking time. I add too minutes because of the size and the cookies got too dark around the edges. I however love extremely crisp cookie edges!

5. adding 1/2 C of Enjoy Life dairy free mini chocolate chips would be yummy!

Enjoy!
~ Blair Lynn


GLUTEN FREE PEANUT BUTTER COOKIES

Ingredients
  • 1 cup peanut butter ( any kind of nut butter will work)
  • 1 cup sugar
  • 2 large eggs
  • ½ teaspoon vanilla
  • 1 teaspoon baking soda
  • pinch of salt or to taste
Instructions
  1. Preheat oven to 350°.
  2. In a mixing bowl, beat together with a fork the peanut butter, sugar, eggs, vanilla, and baking soda.
  3. Stir in the chocolate chips.
  4. Drop spoonfuls onto ungreased cookie sheet and bake for 10 minutes.
  5. Transfer to a wire rack to cool.